
Checking Your Own Fluid Levels: A Practical Walkthrough
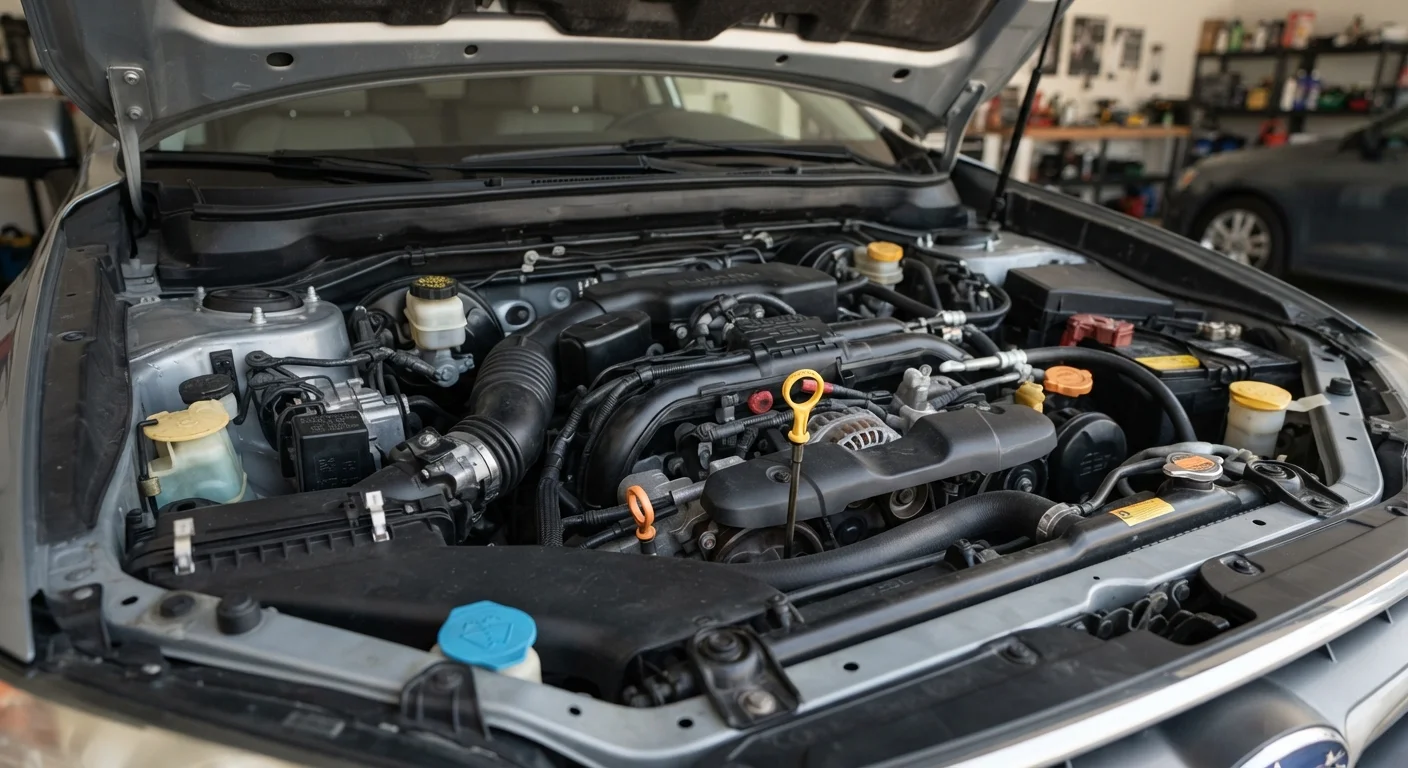
Photo credit: FindersGroove.com | Discover Important Information
In this article
Engine oil, coolant, brake fluid, and more — learn how to locate, read, and top up your car's essential fluids at home.
Key Takeaways
- Most fluid checks require only a clean rag, good lighting, and your owner's manual.
- Always check fluids on a level surface with a cold or fully warmed engine, depending on the fluid.
- Low fluid levels can indicate a leak - topping up without investigating the cause masks a larger problem.
- Your owner's manual specifies the correct fluid type for every reservoir; using the wrong type causes damage.
- Brake fluid and coolant checks carry specific safety precautions that differ from oil checks.
Why This Skill Matters
Fluid checks are the lowest-effort, highest-impact habit in car ownership. Catching a quart-low oil level before a long drive costs nothing; catching it after engine damage costs thousands. Yet many drivers skip checks entirely because no one ever showed them the basics.
This walkthrough covers four fluids that deserve regular attention: engine oil, coolant, brake fluid, and windshield washer fluid. Once you know where each reservoir lives and what a healthy reading looks like, the whole process takes less time than pumping gas. For a broader view of what mechanics cover during a professional service, see what happens during a routine car service.
What you will need
Step-by-Step Fluid Checks
Work through these checks in the order below. The sequence matters: oil is easiest to misread on a hot engine, so starting there when the car is cold produces a more reliable result.
Park on level ground and open the hood
Pull onto a flat surface and turn off the engine. For oil and coolant checks, let the engine sit for at least 5-10 minutes if it was running - or check first thing before any driving. Pop the hood using the interior release lever (usually under the dashboard on the driver's side), then release the secondary safety latch at the front of the hood. Prop the hood open with the support rod.
Check engine oil with the dipstick
Locate the oil dipstick - it typically has a brightly colored (yellow or orange) ring handle and is labeled with an oil-can symbol. Pull it out, wipe it clean with your rag, reinsert it fully, then pull it out again. Hold it horizontally and read where the oil film ends relative to the two marks (MIN and MAX, or two dots). The oil should sit between those marks. Also note the color: healthy oil ranges from amber to light brown. Very dark, gritty oil needs changing regardless of level. For more on oil grades and what to use, see engine oil viscosity grades explained.
Check the coolant reservoir
The coolant (antifreeze) reservoir is a translucent plastic tank, usually located near the radiator. You can read the level through the tank wall without opening it - look for MIN and MAX lines. The coolant should be visible between these marks. Note the color: it's typically green, orange, or pink depending on the formulation. Do not open the radiator cap itself when the engine is warm, as pressurized hot coolant can cause serious burns.
Inspect the brake fluid reservoir
The brake fluid reservoir is a small, often white or semi-transparent plastic container mounted on top of the brake master cylinder, typically on the driver's side near the firewall (the wall between engine and cabin). Like the coolant tank, you can usually read the level through the sides - it should fall between MIN and MAX. Brake fluid is typically clear to light amber when fresh. If it looks very dark, it may need flushing by a mechanic.
Top up windshield washer fluid
The washer fluid reservoir is the easiest to find and the only one where you have real flexibility - it's a blue-capped plastic tank, often in a corner of the engine bay. Remove the cap and use a funnel to add washer fluid until it reaches the fill line. Washer fluid is inexpensive and the only fluid in this list where running low has no mechanical consequence - but it matters for visibility in rain and road-spray situations.
Build It Into a Monthly Habit
Fluid checks are easiest to remember when tied to something you already do - like the first Sunday of each month or every other fuel fill-up. Five minutes of prevention is far cheaper than a single tow. Pairing fluid checks with a broader look at your driving habits can also help: see everyday driving habits that quietly wear down your vehicle for context.
If any fluid is persistently low between checks, don't just keep topping it off - have a mechanic inspect for leaks. Ongoing loss points to a system problem, not just normal consumption. Habits that accelerate fluid wear are covered in habits that quietly shorten your car's lifespan.
Reading the Results and Knowing When to Act
A correct fluid level is only part of the story - condition matters too. Engine oil that looks black and gritty is due for a change even if it sits at the full mark. Coolant that appears rusty or murky signals contamination. Brake fluid that has darkened significantly from its original amber or clear color has absorbed moisture over time and may need flushing.
Never Mix Fluid Types
Adding the wrong coolant formulation, brake fluid grade, or oil viscosity can cause corrosion, seal damage, or system failure. Your owner's manual lists the exact specification for every fluid your car uses - this is not a place to guess or substitute. When in doubt, ask a mechanic before adding anything.
Fluid specifications vary by vehicle. Always cross-reference your findings with your owner's manual before adding anything. If navigating the manual feels daunting, reading your car's service manual without glazing over walks you through it efficiently. For a full seasonal perspective on when to run these checks, see the seasonal car maintenance checklist.
This article provides general educational information about vehicle maintenance. For diagnosis of specific mechanical issues or unfamiliar warning signs, consult a qualified mechanic.

Author
Autos & Driving Editorial Team
Autos & Driving Editorial Team is the collective byline for our editorial team and contributor network. Articles published under this byline or an editorial pen name are researched, written, and reviewed according to our editorial standards for clarity, consistency, and independence before publication.
View all articles →